The IAMX component
One component turns any actor into a connected digital human.
The IAMX Component is the heart of the plugin. Attach it to any actor — a MetaHuman, a stylized avatar, a robot, or an empty Pawn — and that actor gains the full IAMX pipeline: listening, understanding, speaking, lip sync, body animation, and memory. Everything is driven by a single connection ID you copy from the panel at iamx.live, so your level holds no API keys and no provider wiring. The component pulls its personality, voice, language, and enabled features from the cloud at runtime.
This page walks through adding the component, the settings you will touch most often, and how each interaction mode behaves. When you are done here, continue to animation nodes to drive the face and body, and start the conversation.
Add the component
The fastest path from an empty level to a working digital human is four steps. You will need a character connection ID, which you create in the panel (Quickstart covers making your first character if you have not yet).
- Drop your character into the level — drag a MetaHuman actor, your own avatar actor, or any
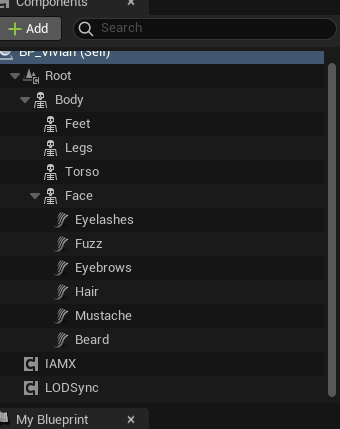
Actor/Pawnfrom the Content Browser into the viewport. The component works with any actor; it only needs a mesh with morph targets if you want facial lip sync. - Select it and Add Component → IAMX — with the actor selected, open the Details panel, click Add Component, and choose IAMX. The component appears in the actor's component tree and its settings expand in Details.
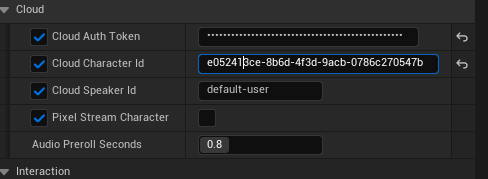
- Paste the character's Connection ID — copy the connection ID from your character's page in the panel and paste it into the component's Connection ID field. This binds the actor to that character's personality, voice, language, and feature set.
- Pick an interaction mode — set Interaction Mode to decide how conversations begin: push-to-talk, voice-activated, wake word, or proximity. Press Play and talk to your character.
What the component brings with it
Listen & understand
Captures speech from the microphone, cleans it, transcribes it, and streams it into the conversation with your chosen LLM — GPT, Claude, Gemini, or a local Ollama model.
Speak & sync
Generates the reply as natural speech and drives the character's mouth and face in real time, sentence by sentence, so audio and lips stay locked together.
Move & remember
Plays idle, talking, and listening body animation automatically, holds eye contact, and can remember returning visitors across sessions.
Key settings
These are the properties you will adjust most often in the Details panel. They live under the component's IAMX category.
| Property | What it does | Default |
|---|---|---|
Connection ID | Binds the actor to a character in the panel. Supplies personality, voice, language, and enabled features. Required. | — |
Interaction Mode | How conversations start: Push-to-talk, Voice-activated, Wake word, or Proximity. See the table below. | Push-to-talk |
Interaction Key | The key held (push-to-talk) or pressed (manual) to talk. Rebind to any key. | T |
Proximity Radius | Distance, in world units, at which a Proximity-mode character wakes up and greets an approaching player. | 250 |
Show Chat UI | Toggles the built-in on-screen chat panel with a mic button, text field, and scrolling transcript. Handy for testing and for text-first kiosks. | On |
Interaction Key
The interaction key does double duty depending on mode. In Push-to-talk the character listens only while the key is held and stops the moment you release it. In manual/testing flows a single press starts and stops a turn. The default is T; rebind it to a controller button, a spacebar, or any key that fits your rig or demo booth.
Interaction modes
The interaction mode decides how a turn begins. All four modes share the same understand-speak-sync pipeline underneath — they differ only in the trigger. Pick the one that matches your environment: a quiet desk demo, a noisy trade-show floor, a hands-free wall panel, or a walk-up kiosk.
| Mode | Behavior | Best for |
|---|---|---|
| Push-to-talk | The character listens only while the interaction key is held. Release to end the turn and get a reply. Zero false triggers because nothing is heard unless you are holding the key. | Noisy rooms, demos, precise control. |
| Voice-activated | Always listening. Detects when you start speaking and automatically stops on silence, then replies. No key required. An echo guard prevents the character from hearing its own voice. | Hands-free, seated one-on-one sessions. |
| Wake word | Idles until it hears its name (or a phrase you configure), then opens a listening window for your request. Ignores everything else, so it can sit in an open space without reacting to passing chatter. | Shared spaces, ambient assistants. |
| Proximity | Wakes and greets when a player enters Proximity Radius, and can wind down when they leave. Turns a walk-up into a conversation with no input at all. | Kiosks, lobbies, exhibits. |
Modes can be switched at runtime, and the panel can override the mode per deployment — so the same build can ship as push-to-talk on a desk and proximity on a kiosk. For the full turn lifecycle, interrupt/barge-in behavior, and cooldown tuning, see the conversation guide.
Choosing a mode
- Building or debugging? Start with Push-to-talk. It is deterministic and keeps the transcript clean while you tune personality and voice.
- Seated experience with one user? Voice-activated feels the most natural — just talk.
- Open area with people passing by? Wake word keeps the character quiet until it is addressed.
- Unattended kiosk? Proximity greets visitors automatically and needs no instructions on a sign.
A minimal setup
You rarely need code, but if you prefer to add and configure the component from C++ or want to see exactly what the four steps do, it looks like this:
// In your actor's constructor or BeginPlay
UIAMXComponent* IAMX = CreateDefaultSubobject<UIAMXComponent>(TEXT("IAMX"));

// Bind to a character in the panel
IAMX->ConnectionID = TEXT("your-character-connection-id");

// How conversations begin
IAMX->InteractionMode   = EIAMXInteractionMode::Proximity;
IAMX->ProximityRadius   = 250.f;   // world units
IAMX->InteractionKey    = EKeys::T;
IAMX->bShowChatUI       = true;

// For a non-MetaHuman avatar:
// IAMX->bUseCustomCharacterMapping = true;
In the editor, the equivalent is: drop the actor, Add Component → IAMX, paste the Connection ID, choose a mode. Both routes end at the same place — a connected digital human ready to talk.
Verify it works
- Press Play — the character should idle naturally. If Show Chat UI is on, the chat panel appears in the corner.
- Trigger a turn — hold the interaction key, speak, and release (or approach the character in Proximity mode). Your words should appear in the transcript.
- Watch the reply — the character speaks, the mouth moves in sync, and body animation shifts to a talking pose. That confirms the whole pipeline — listen, understand, speak, sync — is live.
Next
The component gets your character connected and conversational. From here:
Animation nodes →
Drive the face and body with the IAMX AnimGraph nodes: automatic lip sync, idle/talking/listening blends, and eye contact. See animation.
Start the conversation →
Kick off greetings, handle interrupts, wire actions, and control the flow from Blueprint. See start the conversation.
Related: Quickstart · Install · Conversation & modes · Custom avatars · Blueprint API